Optical Strain Measurement: What to Know
Optical strain measurement is a non-contact measurement technique that employs digital image processing principles. Compared to traditional strain measurement methods, this technique provides a more streamlined solution for testing operations. The increase in testing efficiency is due largely to the elimination of the need for the modification of parts for lead-wire routing and sensor attachment.
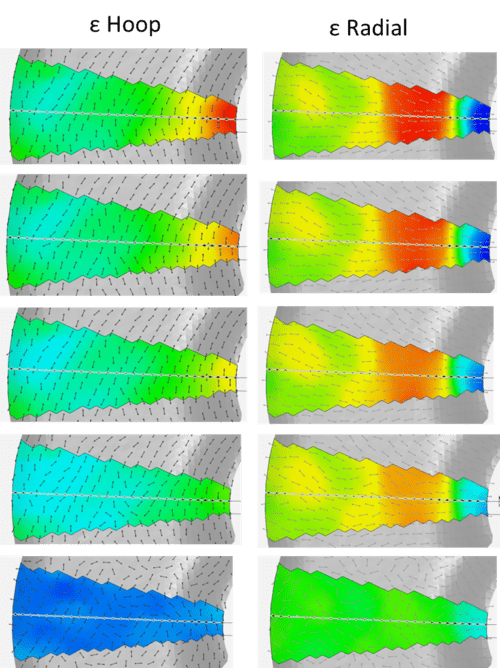
Optical strain measurement offers engineers insight into strain behavior by providing a detailed map of the strain field. This is in direct contrast to more traditional measurement methods, which rely on single-point measurements with only presumed correlations to analytical model measurements.
Essentials of Optical Strain Measurement

A wide variety of strain mapping methods have grown in popularity over the past several years. These techniques determine a part’s surface strain by observing how patterns printed on the part’s surfaces move during deformation.
At TDI, we developed a Rotor Optical Strain System (ROSS) to facilitate optical strain measurement procedures. Using the ROSS, our team targets an area on the test rotor’s surface and marks it with a distinct engineering pattern. The use of this pattern, combined with our proprietary de-rotating system for image capturing, makes it easy to calculate strain via a digital image correlation (DIC) technique—i.e., an experimental technique that measures stress-stain.
Benefits of Optical Strain Measurement
As optical strain measurement utilizes digital image correlation (DIC), it presents several significant advantages over other methods, including:
- More comprehensive insight into strain behavior. Rather than relying on single-point measurements, this method provides engineers with a more detailed strain field map that offers a fuller picture of the strain field and structural performance of the tested product.
- More reliable measurements. Optical strain measurement eliminates the need to assume correlations between actual measurements and measurements from the standard analytical model that is typically required for single-point measurement techniques.
- Less need for parts modification. As a non-contact technique, optical strain measurement eliminates the need to accommodate lead wires, strain gages, and slip rings. This elimination saves on parts cost and allows engineers to modify, inspect, or reconfigure tests (e.g., swapping turbine blades) with ease.
- Less risk of unexpected failure. As this technique eliminates the need for strain gages and lead wires, it reduces the risk of measurement failure due to component failure and increases the likelihood of collected data maintaining its integrity.
- More potential for future applications. On the whole, optical strain measurement offers a much greater degree of applicability than alternate measurement techniques. The necessary equipment can easily be set up in stand-off positions; this, in turn, allows for strain measurement even under extreme environmental or operating conditions (e.g., high temperatures).
While optical strain measurement has been used for well over a decade on static components, applying the process to high-speed rotation components is relatively new. That’s why we seek to improve measurement technologies to position optical strain measurement as a cost-effective tool for a bevy of high-speed testing and production applications.
Test Devices’ Optical Strain Measurement Services
At Test Devices, we’ve developed an application for the optical strain technique for high-speed rotating parts. Our work on this innovative and forward-thinking process presents a clear opportunity for our clients.
Interested in partnering with Test Devices, Inc. to learn more about your parts’ capability and performance? Looking to weed out weak components and strengthen the parts you rely on in your industry and application? Request a quote today to find out more about our optical strain measurement services.


Comments are closed